|
06-20-2011, 01:13 PM,
(This post was last modified: 06-23-2011, 04:23 PM by ashimo.)
|
|||||
|
|||||
Page 2: Structure of a Program that Reads Data from a File
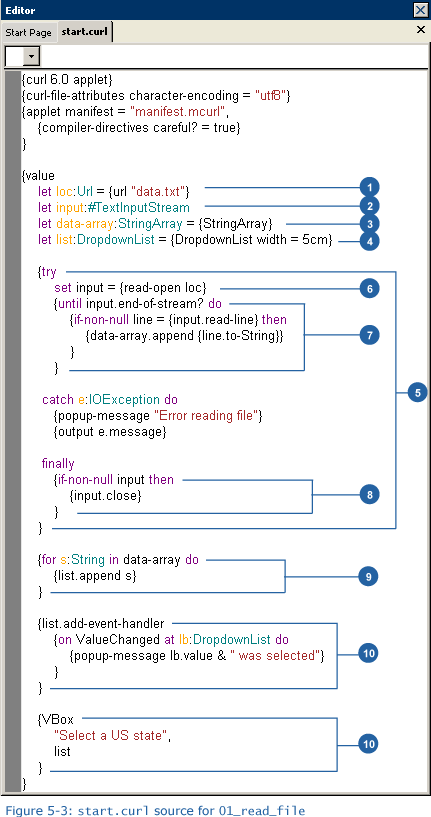
 Structure of the Program that Reads Data from a File Structure of the Program that Reads Data from a File First, let’s consider how we can read the data that is written into a file. There are actually four steps involved in reading such data. These are as follows:
Let’s start by taking a look at the program’s source code.  1. Specifying the location of the file (Step 1) Code: let loc:Url = {url data.txt}In the first step we need to specify the location of the file we will be reading. The location of the file is specified with a variable called a Url. In the url procedure, we set a character string value that specifies the path to the file. 2. Declaring TextInputStream Code: let input: #TextInputStreamTo read a text file, we use TextInputStream. In this example, an initial value is not set for the variable declaration. In this case, we preceed TextInputStream with a # so that the default value (null) will be legal. 3. Declaring the character string array that is used to store the read datas Code: let data-array:StringArray = {StringArray}Here, data is read from the file line-by-line and then saved into a StringArray. StringArray is an abbreviation for {Array-of String}. 4. Creating the variables that are used for display Code: let list:DropdownList = {DropdownList width = 5cm}We declare the list variable as a DropdownList that is used to display the read-in data. 5. Exception processing Code: {tryIf the file cannot be opened or read, the Curl RTE detects that the operatio cannot be completed normally. This is known as an exception. If an exception occurs, this program performs exception processing to prevent an error with the applet. In our example, when the file at the specified URL is opened, an exception may occur when data is read from the file. To handle an exception, we use the try expression. That location at which an exception may occur is enclosed in the try expression. Also, we define a catch clause that handles exceptions that may occur. For every try expression, we can define multiple catch clauses. Each catch clause is used to define a specific exception to be handled. In our example, we specify an IOException because we are dealing with input/output operations. It is also possible to catch all exceptions by specifying Exception for the type of the exception processed by each catch phrase. At the end, we use the finally clause to describe processing that must be performed regardless of whether an exception has occurred.  Exception Processing Exception ProcessingCode: {trywhere
6. Opening a file (Step 2) Code: set input = {read-open loc}TextInputStream is opened from the file URL; this is the second step. Using the read-open procedure, we specify the URL as the argument and the file is opened as a TextInputStream. 7. Opening a file (Step 3) Code: {until input.end-of-stream? doAfter the file is opened as a TextInputStream, the data is read using the until expression. In this case, the code block is processed repeatedly until the specified boolean expression becomes true. There are three types looping expressions in Curl: until, while, and for. Let's look at the until and while expressions now (we'll cover the for expression later). These two expressions have a body that is repeatedly executed until a specified expression becomes either true or false.  until expression until expressionCode: {until conditional_expression dountil processing is repeated until the condition is true.  while expression while expressionCode: {while conditional_expression dowhile processing is repeated until the condition is false. Now, let’s take a look at our example. Code: {until input.end-of-stream? doIn the example, the input.end-of-stream? expression indicates the condition. When the TextInputStream reaches the end of the stream, the expression returns a value of true, so, the until expression is repeatedly processed until it reaches the end of the stream.  Streams StreamsStreams are sequences of data that your applets can either read from or write to. They create a generic interface for exchanging data with resources. The next expression in our example is if-non-null. This expression is very similar to the if, but the if-non-null expression branches based on whether the value is of the expression is null or not (rather than true or false). Therefore, when the value of the expression is non-null, the the specified code block is executed.  if-non-null if-non-nullCode: {if-non-null [var-name[:type] = ] expr
Let’s take a look at the example. Code: {if-non-null line = {input.read-line} thenThe input.read-line method lets us read data from the TextInputStream line by line. In our example, whenever the value is non-null, one line of data has been read. The text of each line read will be appended to an array. In addition to read-line, there are several methods for reading data. Finally, let’s take a look at the processing following the if-non-null expression. data-array is a String array, as described above. Using the append method, we can add an element to an array. The following table describes other methods that can be used to manipulate array contents. The input.read-line method returns the data that has been read from a file. This value is returned as a StringBuf. Since elements of this array are of String type, we use the to-String method to convert from StringBuf to String. The value is then added to the array. In summary, the processing performed involves reading all the stream data line-by-line and provided that data is non-null, converting the data to a String and adding it to the array. 8. Closing the file (Step 4) Code: {if-non-null input thenThe file is closed after the data is read from the file. A close must always be performed, regardless of whether an exception has occurred, so it is performed in the finally clause. In our example, we use if-non-null to check whether the file was ever opened. If the file is open, the close method is used to close the file. 9. Adding elements to the drop-down list Code: {for s:String in data-array doSince the data that is read from a file is stored in the array named data-array, we can access each element as input for our dropdown list. The data is taken, in order, and then added to a DropdownList control named list. The body of the for expression is executed repeatedly, each time adding another element to the DropdownList. Curl supports two variations of the for expression. The first is used to specify a range and executes the body for each value in the range, while the second executes the body for each value in a collection of elements, such as an array.  What is a Collection? What is a Collection?A “collection” is a group of elements, all of which are of the same data type. Arrays and hash tables are both typical examples of collections.  for expression, executed repeatedly within a given range for expression, executed repeatedly within a given rangeCode: {for repeat variable:int = initial_value to final_value step step_size doIf we omit step step_size, the variable value is increased (or decreased), by 1 each. Instead of to, we can also specify below, downto, or above.
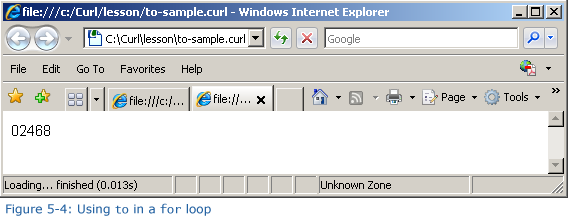
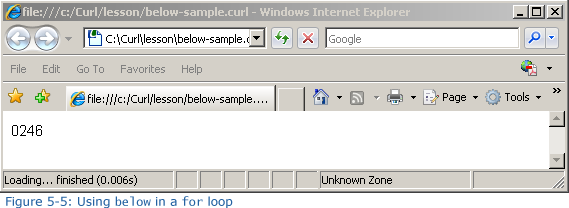
Let’s execute the following two pieces of source code and see how the results differ. When we use to, the results should be 0 2 4 6 8. When we use below, it should return 0 2 4 6.
Code: {value
Code: {value The for expression that takes its values from the elements of a collection, will be as follows:  for expression for expressionCode: {for element _variable[:element_type] key key_variable[:key_type] in collection_name doIn our example, we use the for expression which repeats only the values among the elements of an array. The data is extracted from the element values in the array, and then added as items to be shown in the dropdown list. 10. Adding an event handler Code: {list.add-event-handlerCurl supports a method for adding an event handler, as mentioned in Try 2. We can use this method to specify that, when a value is selected from the dropdown list, it is displayed in a pop-up window. 11. Specifying the layout Code: {VBoxWe specify the screen display layout at the end of value. Character strings and the dropdown list are arranged vertically. |
|||||
|
« Next Oldest | Next Newest »
|
| Possibly Related Threads... | |||||
| Thread | Author | Replies | Views | Last Post | |
| Page 8: Extra Practice | ashimo | 0 | 3,482 |
06-20-2011, 01:34 PM Last Post: ashimo |
|
| Page 7: Summary | ashimo | 0 | 3,046 |
06-20-2011, 01:23 PM Last Post: ashimo |
|
| Page 6: Structure of a Program that Reads our Score Data | ashimo | 0 | 2,970 |
06-20-2011, 01:21 PM Last Post: ashimo |
|
| Page 5: Application: Reading Our Score Data | ashimo | 0 | 2,775 |
06-20-2011, 01:20 PM Last Post: ashimo |
|
| Page 4: Structure of a Program that Writes Data to a File | ashimo | 0 | 3,148 |
06-20-2011, 01:18 PM Last Post: ashimo |
|
| Page 3: Basics 2: Writing a Control Value into a File | ashimo | 0 | 3,022 |
06-20-2011, 01:16 PM Last Post: ashimo |
|
| Page 1: Reading Our Score Data | ashimo | 0 | 3,171 |
06-20-2011, 01:12 PM Last Post: ashimo |
|
Users browsing this thread:
1 Guest(s)
1 Guest(s)


